21 Winter French Tip Nail Ideas
Few nail designs have remained as popular as the French tip, yet winter always seems to bring a fresh twist to the classic look. Cooler color palettes, metallic accents, snowy details, and rich seasonal tones can completely change the feel of a French manicure while keeping its timeless appeal intact.
“Winter French tips stand out because they blend the elegance of a classic manicure with colors and details inspired by the season.”
Some designs keep things minimal with subtle color changes, while others incorporate glitter, chrome finishes, or festive accents for a bolder statement. The ideas below showcase a variety of winter French tip styles that feel stylish, seasonal, and easy to wear throughout the colder months.
Frosty White Tips With Silver Glitter Accent

A classic frosty white tip becomes winter-ready when you layer fine-grain silver glitter over the smile line.
You’ll need an opaque white polish for your base tips, followed by a sheer silver micro-glitter topcoat applied while the white remains tacky. This creates seamless adhesion without distinct layers.
For optimal execution, cure each coat fully if using gel formulas.
The glitter concentration determines your finished intensity—one coat delivers subtle sparkle, while two creates dense coverage.
Apply the glitter precisely along the tip’s edge using a striping brush for controlled placement.


Icy Blue Ombre French Tips
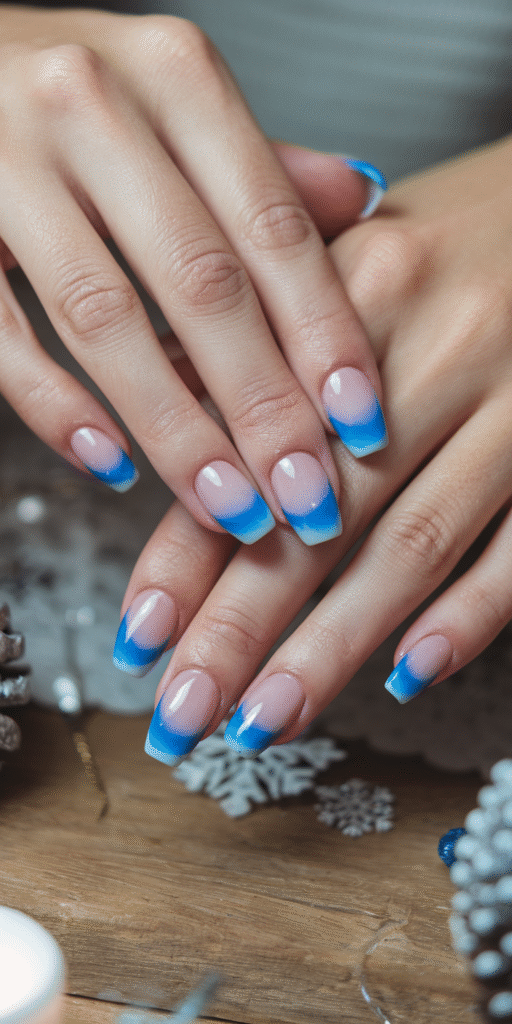
Icy blue ombré tips create dimensional color that mimics frozen winter landscapes through gradient gel polish application.
This technique uses powder blue, arctic white, and clear base tones applied with makeup sponges or airbrush tools for seamless blending. The lightest shade begins at the cuticle, gradually intensifying toward the tip.
Master this effect by working in thin layers, curing each coat under LED for precise color control.
Position the darkest blue concentration at the free edge, blending upward with strategic sponge-dabbing motions. Seal with high-gloss topcoat to enhance the glass-like finish characteristic of ice formations.

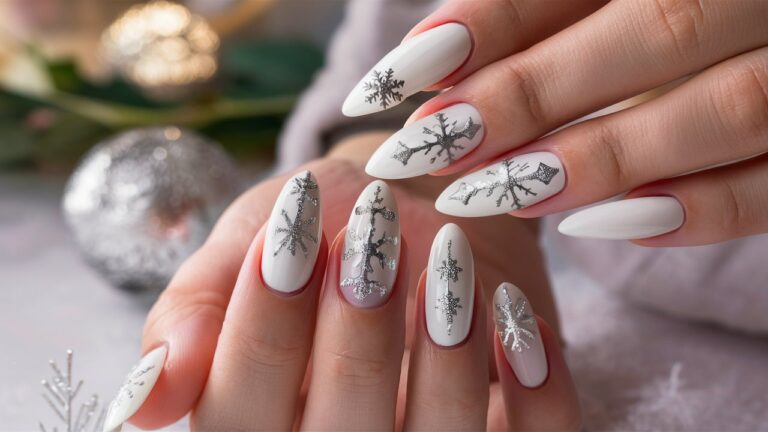
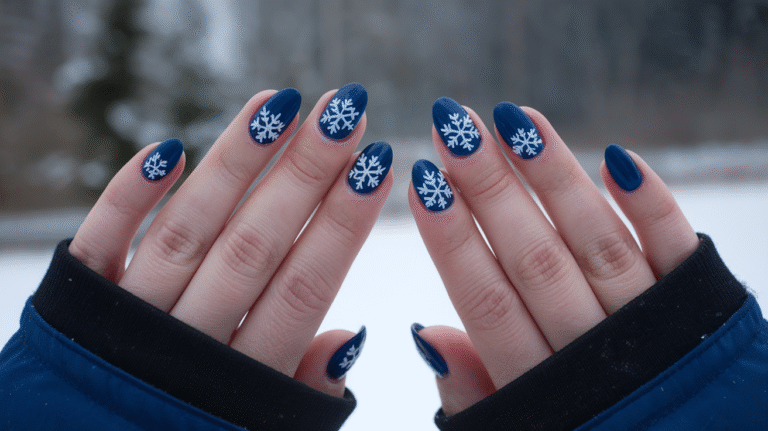
Snowflake Detail on Classic French Manicure
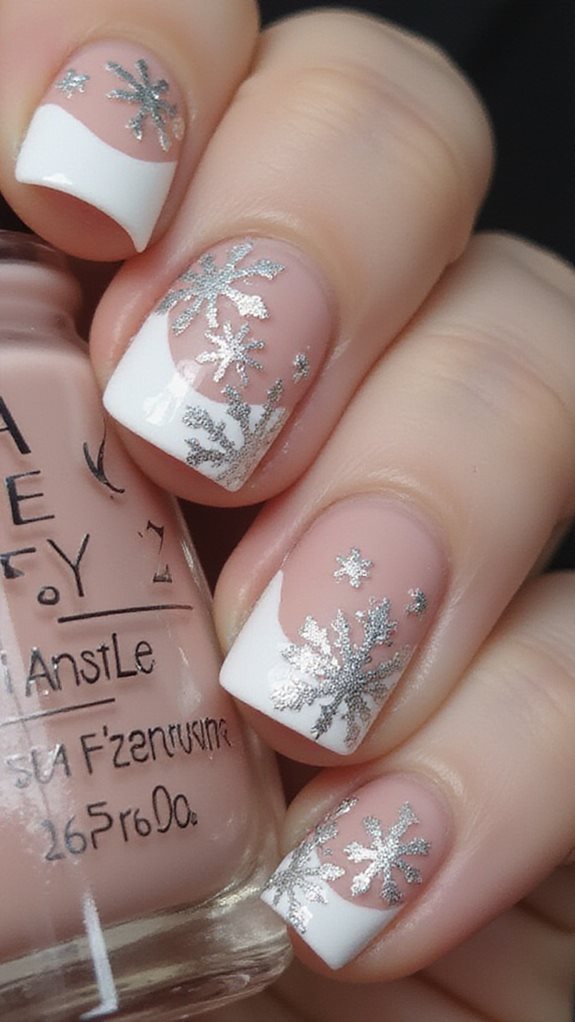
Hand-painted snowflakes elevate the classic French manicure into elegant winter nail art. Using a size 00 or 000 detail brush with white acrylic paint or gel, create delicate crystalline designs by layering intersecting lines—vertical, horizontal, and diagonal crosses.
Add tiny perpendicular dashes along each branch to capture authentic snowflake detail.
Apply snowflakes to one or two accent nails per hand for sophisticated restraint. Position designs asymmetrically near the tip’s edge or cuticle area to maintain visual interest while preserving the French manicure’s timeless foundation.
Layer clear topcoat between applications or add iridescent microglitter for dimension, sealing with gel topcoat for lasting wear.


Deep Navy Tips With Gold Foil
Deep navy creates a sophisticated alternative to traditional white French tips, especially when paired with metallic gold foil accents.
Quality navy gel polish with high pigmentation achieves crisp, opaque tips in two coats. Apply your base color, cure, then paint the tips using a precise striping brush for clean edges.
For gold foil techniques, apply a thin layer of foil adhesive along the smile line after curing your navy nail art. Wait until the adhesive becomes tacky—approximately 30 seconds—then press small pieces of gold leaf onto the surface.
Seal everything with a gel top coat, ensuring you cap the free edge for maximum durability and shine.


Shimmering Silver Chrome French Tips
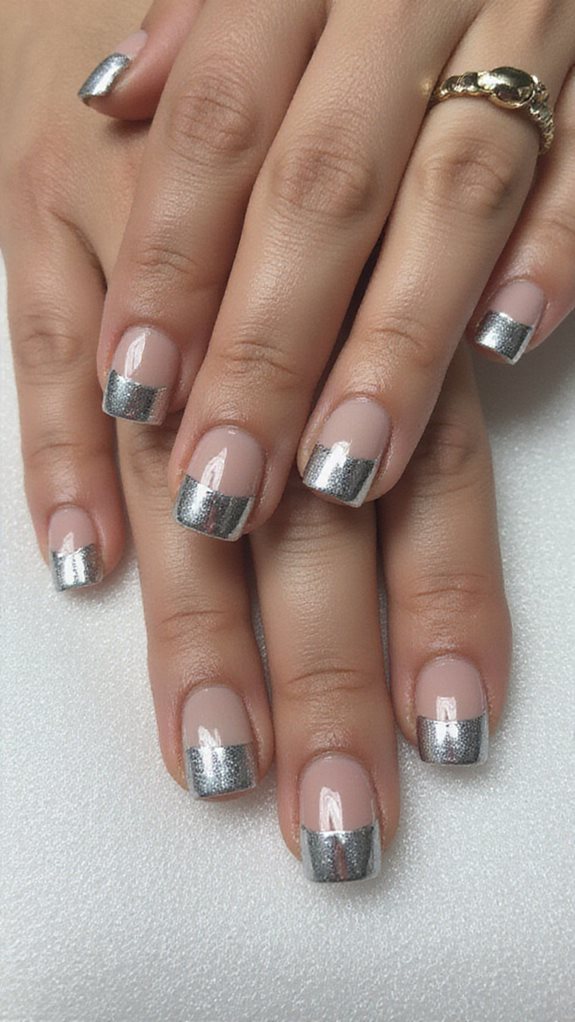
Silver chrome powder delivers a mirror-like finish that elevates the classic French manicure into futuristic territory.
Apply the powder over a black gel base for maximum reflectivity, using a silicone applicator to burnish the chrome into seamless coverage. The shimmer techniques require precise tip mapping—clean, sharp lines where the chrome meets your natural nail bed.
For optimal chrome finishes, cure your gel base at lower watts to prevent shrinkage that disrupts the metallic surface.
Apply a no-wipe top coat specifically formulated for chrome applications, as standard formulas can dull the mirror effect. The silver reflects light from multiple angles, creating dimensional depth that traditional polish can’t achieve.


Cozy Cable Knit Sweater Design Tips

Cable knit textures translate beautifully to nail art when you layer gel polishes with strategic stamping plates designed for sweater patterns.
You’ll need a thick-consistency white or cream gel polish as your base, followed by Born Pretty’s BP-L045 stamping plate featuring authentic knit textures.
Apply the base coat, cure for 60 seconds, then stamp cozy patterns using a dual-ended silicone stamper for maximum detail transfer.
For dimensional effects, use Modelones’ 3D gel paste to trace the raised cable lines.
Work with a 0.5mm dotting tool to create individual knit stitches along the tip line.
Cure each layer separately—30 seconds for stamped designs, 90 seconds for textured paste.

Burgundy and White Diagonal French Tips

Diagonal French tips in burgundy and white create striking asymmetry through precise angle control and clean color blocking.
Position striping tape at 45-degree angles across each nail to achieve sharp diagonal lines. Start with a white base coat, then secure the tape diagonally before applying two coats of burgundy polish on one side.
The burgundy color palette works best with oxblood or wine-toned formulas that provide full opacity.
Remove the tape while polish remains wet for clean separation, then use a detail brush with acetone to refine edges.
Finish with a glossy top coat for professional results.


Holographic Glitter Gradient Tips
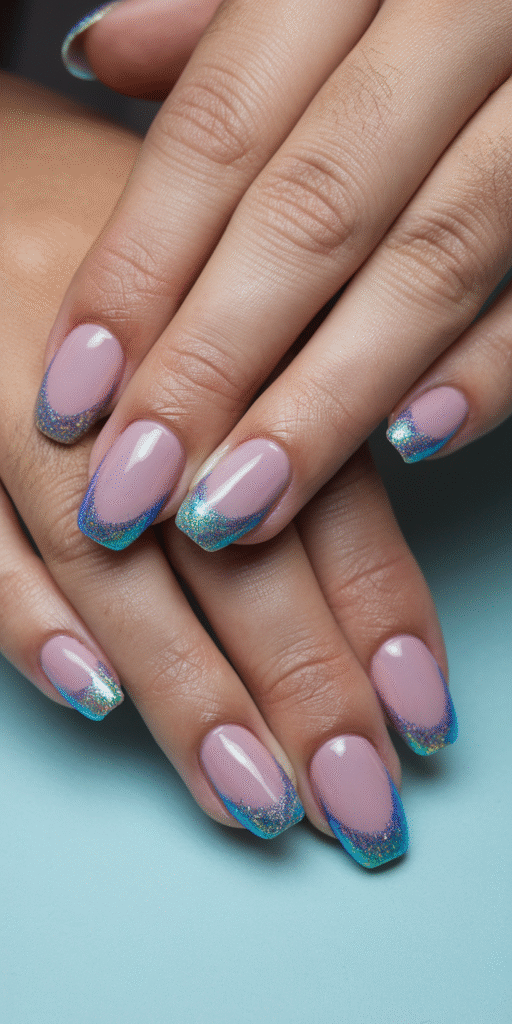
Holographic glitter gradient tips create a stunning dimensional effect as light catches the particles, shifting from a clear base to concentrated sparkle at the nail’s free edge.
This technique uses fine-milled holographic particles applied in progressive layers to build intensity toward the tip. The result is a seamless transition that transforms nails into prismatic displays.
The application process involves dabbing holographic polish with a makeup sponge, extending each layer slightly lower to create smooth gradients.
Advanced methods include mixing holographic pigments with clear gel medium for precise control, layering ultra-fine particles first before adding larger flakes for depth.
Each layer cures under LED for thirty seconds before sealing with a glossy top coat to amplify the holographic effect and lock particles in place.


Matte Black Tips With Crystal Accents
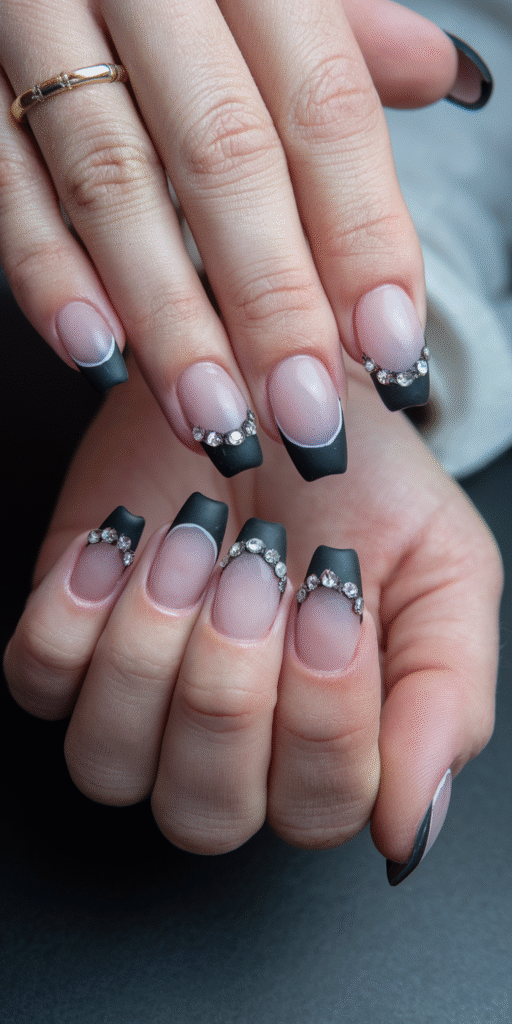
Matte black tips with crystal accents deliver a sophisticated contrast between velvety texture and brilliant sparkle, transforming traditional French manicures into high-fashion statements.
Apply a quality matte topcoat over black gel polish to achieve the signature non-reflective finish. The matte black backdrop intensifies the crystals’ refractive properties, maximizing their visual impact without requiring excessive embellishments.
Position crystal accents asymmetrically for modern appeal or create uniform patterns for classic elegance. Use a dotting tool to strategically place individual Swarovski crystals or rhinestones along the smile line while the final layer remains tacky. Cure under LED light for 30 seconds to secure your design.


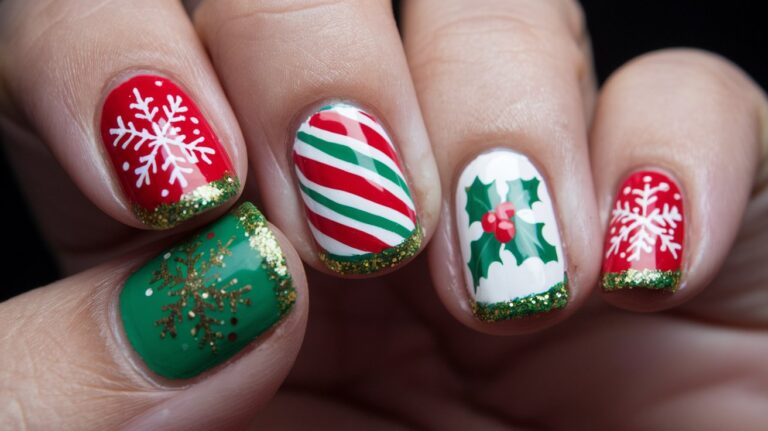
Candy Cane Striped French Tips
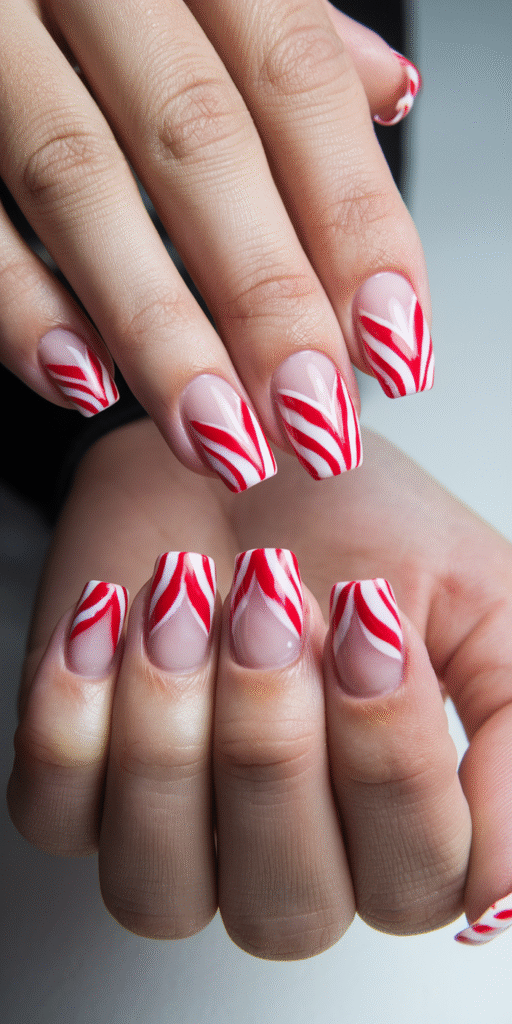
Candy cane striped French tips capture holiday nostalgia through precise red and white diagonal lines that mimic the iconic peppermint confection.
The technique requires striping tape, quality red gel polish, and pure white to create authentic candy cane nail art.
Apply your white base first, cure completely, then position striping tape at 45-degree angles across the tip.
Alternate red stripes between tape sections, maintaining consistent width for professional results.
Remove tape immediately after applying each color to prevent polish bleeding.
Seal everything with glossy top coat to enhance dimension and create that polished candy cane effect.


Emerald Green Tips With Gold Line Detail
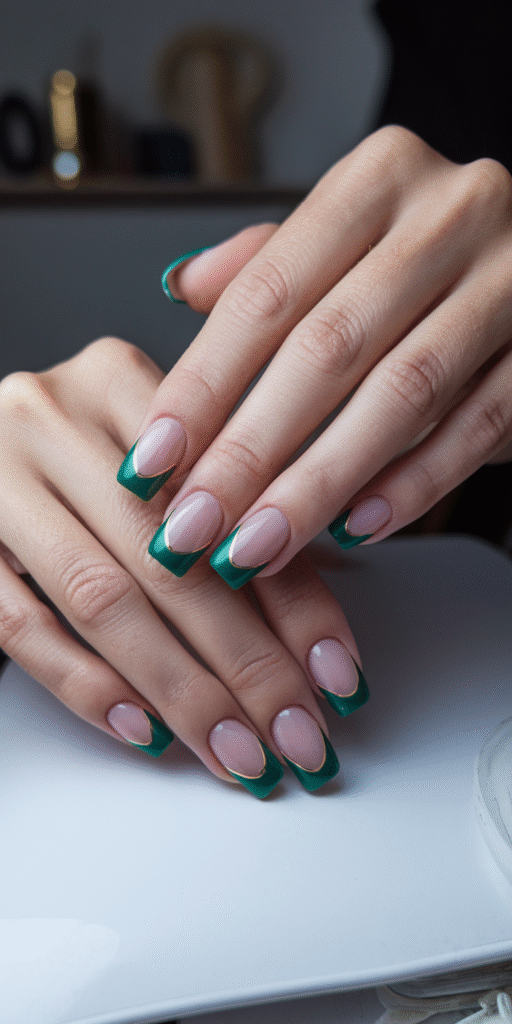
Emerald green tips with gold line detail deliver sophisticated winter elegance through strategic metallic accents.
Apply the emerald polish in a 2mm curved arc along the smile line, then cure completely. Use a striping brush with gold chrome polish to trace a thin line directly above the color junction, creating refined definition.
Anchor your hand on a stable surface and pull the brush toward yourself in one smooth motion for precise gold detailing. Practice on a palette first to ensure steady application.
Seal with glossy top coat to protect the metallic accent and enhance the emerald’s jewel-tone intensity.


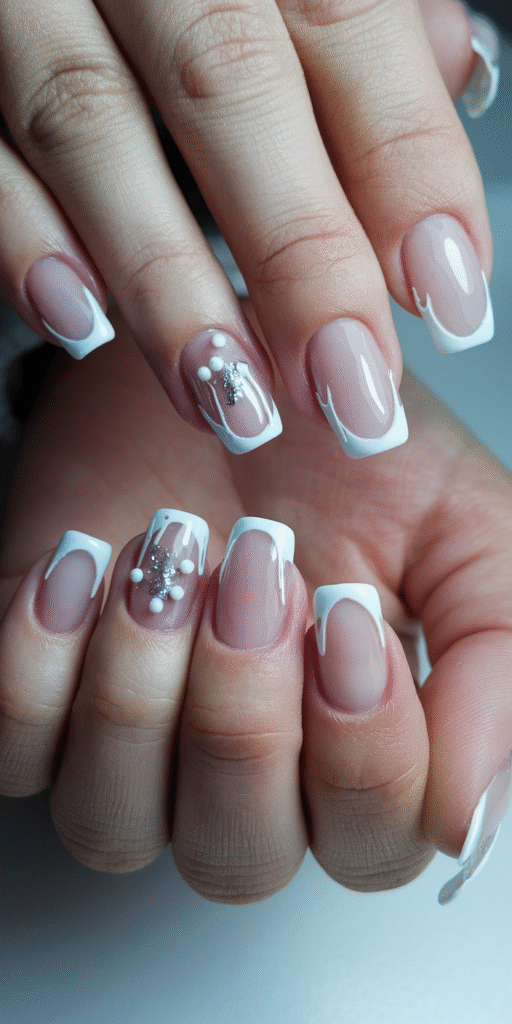
Pearl-Embellished White French Tips
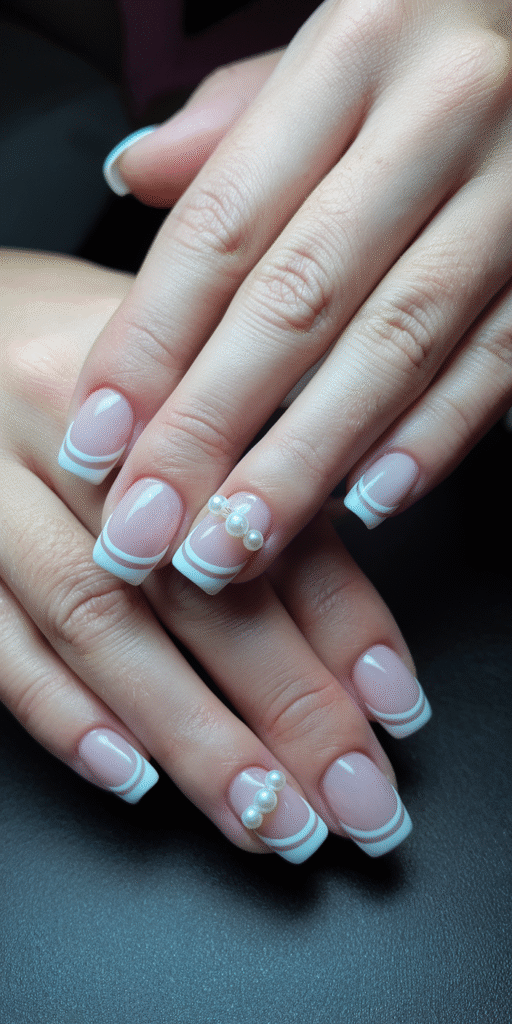
Pearl-embellished white French tips transform classic manicures into luxurious winter statements through dimensional texture.
Apply a crisp white tip using gel or traditional polish, then strategically place micro pearls, caviar beads, or larger pearl accents along the smile line or accent nails.
Embellishment techniques include dotting wet topcoat as adhesive for individual pearl placement, pressing pearls into uncured gel for secure bonding, or creating clustered patterns at the sidewalls.
Pearl color options extend beyond classic white—consider champagne, silver, or iridescent varieties that shift under winter light.
Apply pearls using tweezers or a dotting tool for precision placement, then seal embellishments with thick topcoat ensuring complete coverage around each pearl’s base.
This technique works exceptionally well on almond or coffin shapes where the extended canvas showcases the dimensional elements.


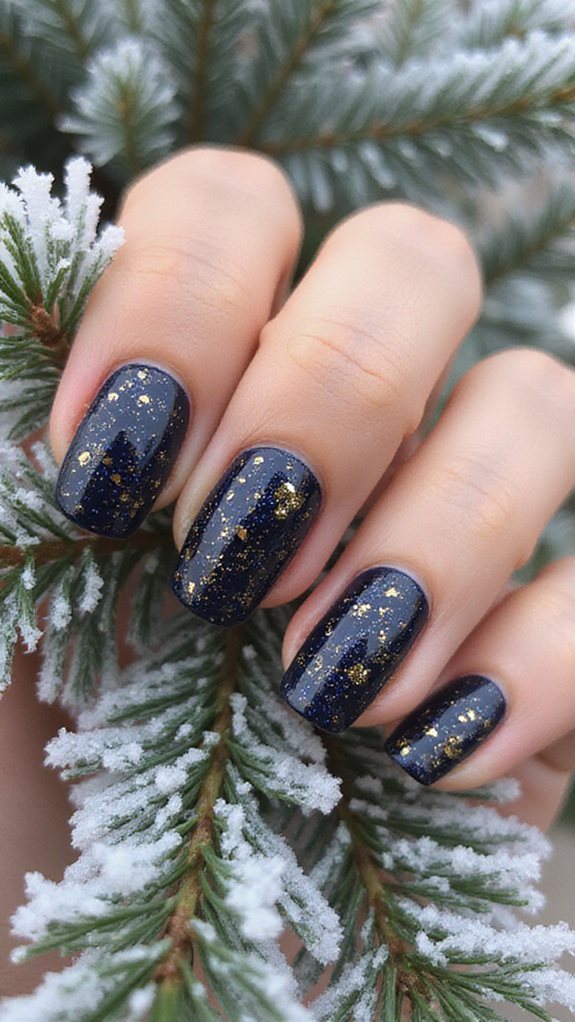
Midnight Blue Tips With Star Accents
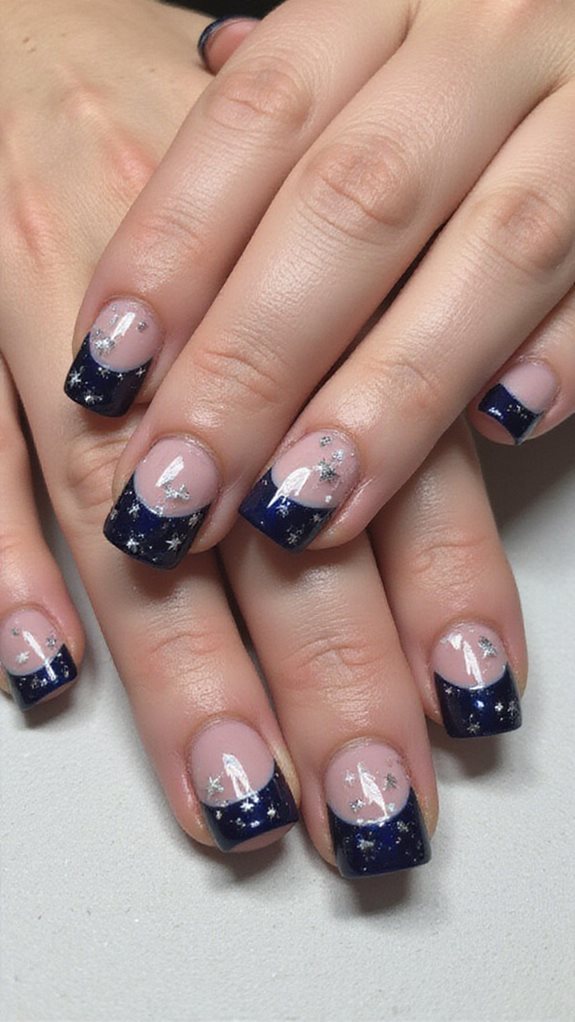
Midnight blue French tips capture the essence of winter nights through deep, saturated pigmentation that mirrors the 10pm sky. Highly-pigmented navy gel polish should apply opaque in two coats, with clean edges along the smile line created using a striping brush or precision tip applicator.
This dramatic base provides the perfect canvas for celestial embellishments.
Star accents require specialized application techniques for professional results. Apply micro silver stars using a damp dotting tool, pressing them into tacky gel before curing, or hand-paint celestial details with a 000 liner brush and metallic polish.
Seal everything with a thick-viscosity top coat, encapsulating dimensional embellishments completely and curing for ninety seconds to prevent shifting.


Rose Gold Metallic French Tips
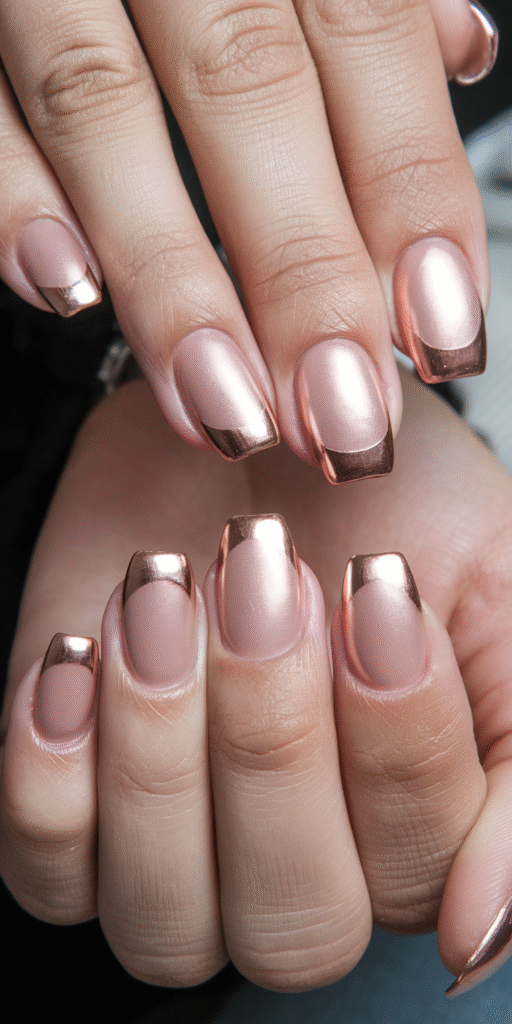
Rose gold metallic French tips deliver warmth to winter manicures through their copper-pink undertones that complement cool-weather fashion palettes.
Optimal results come from using chrome powders or gel polishes specifically formulated for metallic finishes. Apply a nude or blush base coat, then paint rose gold tips using thin, even strokes for consistent opacity.
Cure gel formulas for 60 seconds under LED lamps to prevent dulling.
Rose gold application techniques include ombré transitions, where the metallic shade blends into the base color using a makeup sponge. This versatile shade pairs exceptionally with burgundy, forest green, and navy winter wardrobes.


Plum Purple Tips With Silver Shimmer
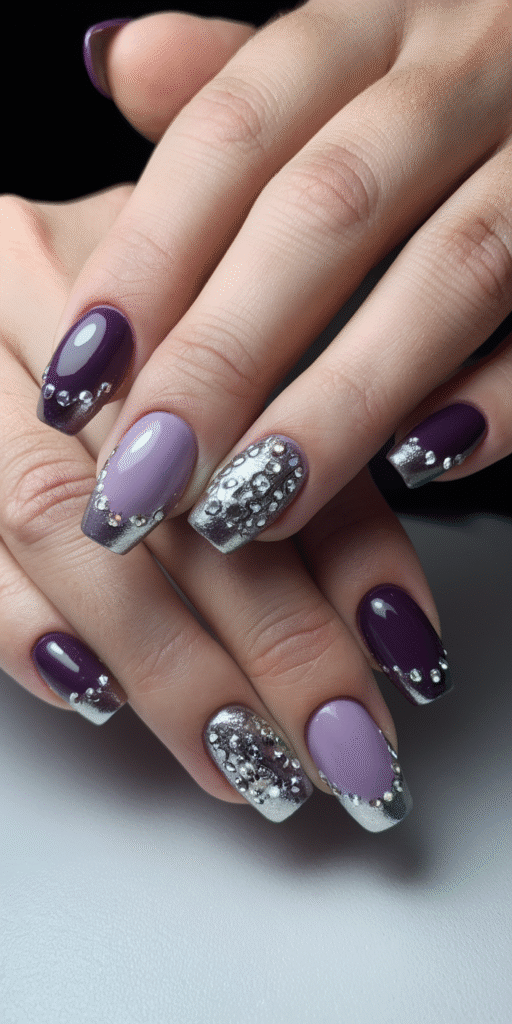
Plum purple tips with silver shimmer create dimensional winter manicures through the strategic layering of deep berry tones and reflective particles.
A rich plum purple gel polish serves as the base color, applied in two thin coats for opacity. The plum purple extends along the tip edge using a detail brush, maintaining a precise smile line.
Once cured, a silver shimmer topcoat layers specifically over the purple tips to amplify depth. Silver shimmer formulas containing micro-fine glitter particles rather than chunky glitter provide maximum reflectivity.
The dark plum purple provides contrast while the silver shimmer catches light, creating movement and visual interest.


Snowfall Glitter Fade French Tips

While metallic accents enhance winter tips with reflective shine, glitter gradient techniques create atmospheric effects that mimic falling snow. Achieving this snowfall nail art involves applying white or clear glitter polish in graduating densities from tip to mid-nail.
Start with dense concentration at the free edge, then lighten pressure with each subsequent coat moving toward the cuticle. For optimal glitter fade design, use a makeup sponge to dab decreasing amounts of glitter particles.
Layer fine iridescent glitter over holographic base coats to create dimensional depth. The technique requires three glitter sizes: fine, medium, and chunky flakes positioned strategically, with larger particles near tips and micro-glitter for the fade zone.


Frosted Glass Effect Tips

Translucent finishes create sophisticated winter nail designs through strategic layering of sheer white and pearl polishes over nude bases.
Achieve the frosted glass effect by applying Essie’s “Blanc” or OPI’s “Alpine Snow” in thin, semi-opaque coats. Build dimension using two to three layers, allowing each to dry completely.
Apply a matte topcoat like Seche Vite’s Ultra-V for authentic glass texture. Enhance the effect by mixing white polish with clear base at a 1:3 ratio or using a makeup sponge to dab iridescent powder along tip edges before sealing.
This technique works exceptionally well on almond and stiletto shapes, where light naturally refracts through the extended tips.


Cranberry Red Tips With White Accents
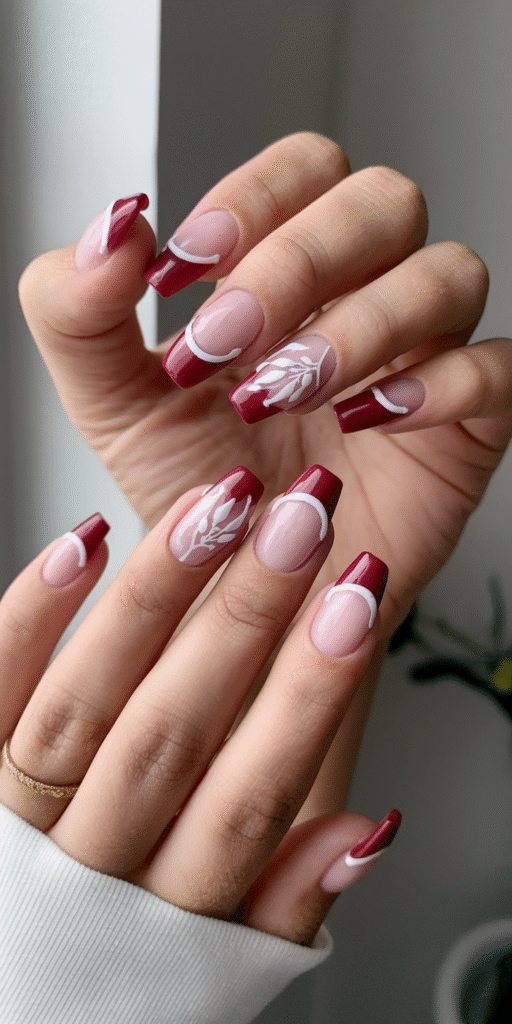
Rich burgundy tones paired with crisp white details deliver a festive contrast that captures winter’s dual nature of warmth and cold.
High-pigment cranberry red polish applies opaque in two coats, with red oxide pigments providing depth.
Create precise tips using a detail brush dipped in white gel polish for clean, striking lines.
Dimensional nail art comes alive with micro snowflakes using dotting tools in varying sizes.
Seal with a glossy topcoat to intensify color vibrancy and protect your design.
The reverse palette works beautifully too: white base with cranberry red tips and hand-painted holly berries.


Icicle-Inspired Clear and White Tips
Icicle formations inspire this crystalline nail design through strategic layering of sheer and opaque materials.
Achieve authentic icicle nail art by applying a clear gel base, followed by thin white polish tips that taper irregularly—mimicking natural ice formations.
Position iridescent glitter particles along the tip edges to replicate frozen crystallization.
For dimensional effects, use clear builder gel to create raised droplet textures.
Apply chrome powder sparingly on select nails for reflective properties.
Seal everything with high-gloss topcoat to enhance the glass-like finish.


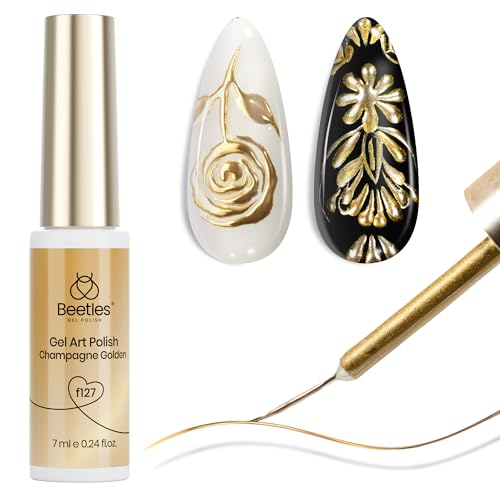
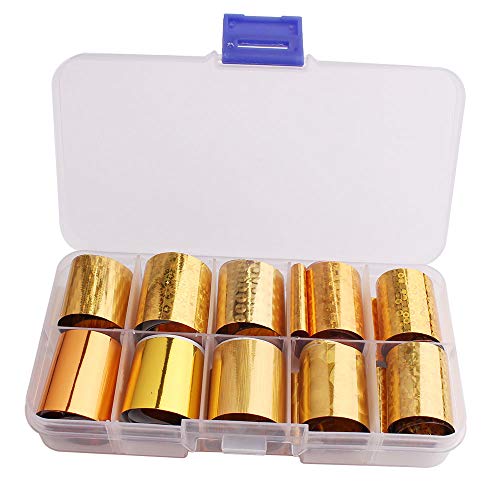
Champagne Gold Foil French Tips
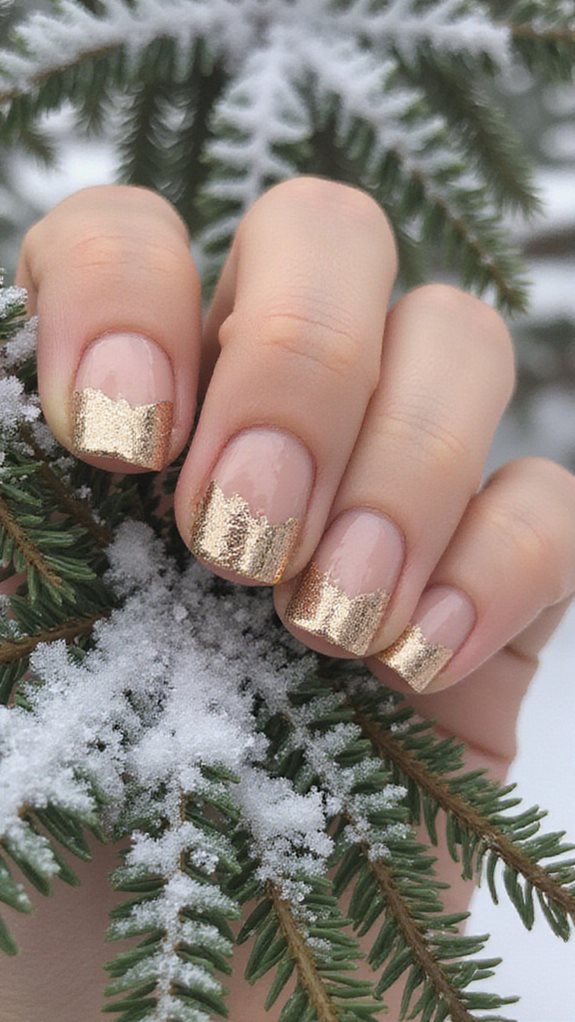
Champagne gold foil transforms traditional French tips into luxurious statement nails through precise application techniques.
You’ll need nail adhesive specifically formulated for foil application, ensuring optimal transfer and longevity. Apply your base color and white tip first, allowing complete curing.
Cut champagne gold foil into strips matching your nail width for efficient application. Brush a thin layer of foil adhesive along the smile line, waiting until it becomes tacky but not wet.
Press the foil firmly onto the adhesive with the colored side facing up, then peel away swiftly in one motion to reveal the metallic champagne gold accent.

Winter Wonderland Scene French Tips
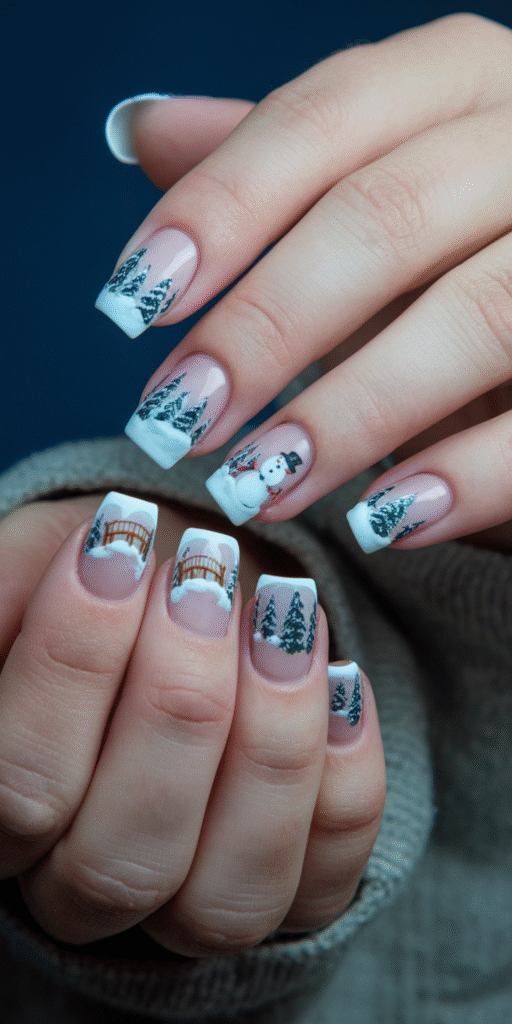
Winter wonderland scenes require specialized miniature art brushes in sizes 10/0 and 20/0 for creating detailed landscapes across your French tips.
You’ll need white gel polish for snow bases, iridescent pigments for shimmer effects, and fine-tip dotting tools for falling snowflakes.
Apply a nude or sheer pink base, then paint your scenic elements—pine trees using dark green mixed with black, tiny cottages with red roofs, and snow-covered hills.
Layer dimensional snow using thick white gel, creating texture through stippling motions.
These winter nail designs work best on almond or coffin shapes, providing adequate canvas space.
Seal your festive nail art with glossy top coat, then add holographic flakes while tacky for ethereal sparkle that mimics fresh snowfall under moonlight.


Frequently Asked Questions
How Long Do Winter French Tip Nails Typically Last?
You’ll get 2-3 weeks of wear with proper application. Follow winter nail care protocols: apply cuticle oil daily, wear gloves outdoors, and avoid harsh chemicals. These nail maintenance tips prevent chipping and extend your manicure’s longevity significantly.
Can Winter French Tip Designs Work on Short Nails?
Yes, you’ll find short nail designs perfectly accommodate winter French tips. They’re actually ideal for showcasing festive color options like metallics, snowflakes, or jewel tones. Apply thin tip lines to maximize your nail bed’s visible space for balanced proportions.
What Nail Shape Works Best for French Tip Designs?
You’ll achieve optimal results with almond or oval nail shapes for French tips, as these design trends provide maximum surface area for clean application. Square shapes work too, though they require precise edge-work to maintain professional polish placement and symmetry.
How Much Do Professional Winter French Tip Manicures Usually Cost?
You’ll typically pay $45-$75 for professional winter French tip salon services, depending on your location and design complexity. Manicure pricing increases with added elements like snowflakes, glitter, or chrome finishes requiring specialized application techniques and premium gel products.
Can I Do Winter French Tips at Home Myself?
You can absolutely create winter french tips at home using proper nail care and DIY techniques. You’ll need quality gel or regular polish, striping brushes for snowflake details, and steady application following proper base coat, color layering, and top coat sequences.
Finally
You’ll achieve the longest wear by prepping your nail bed with a dehydrator and applying a quality base coat before creating your french tips. Use thin, even layers of gel polish—curing each for 60 seconds under LED.
For chrome and foil effects, you’ll need to work quickly and press firmly into tacky layers. Seal everything with a no-wipe top coat, capping the free edge. You’ll get 2-3 weeks of chip-free wear with proper application.